exchangelib
Python client for Microsoft Exchange Web Services (EWS)
Exchange Web Services client library
This module is an ORM for your Exchange mailbox, providing Django-style access to all your data. It is a platform-independent, well-performing, well-behaving, well-documented, well-tested and simple interface for communicating with an on-premise Microsoft Exchange 2007-2016 server or Office365 using Exchange Web Services (EWS). Among other things, it implements autodiscover, and functions for searching, creating, updating, deleting, exporting and uploading calendar, mailbox, task, contact and distribution list items.
Apart from this documentation, we also provide online source code documentation.
Table of Contents
- Installation
- Setup and connecting
- Folders
- Dates, datetimes and timezones
- Creating, updating, deleting, sending, moving, archiving, marking as junk
- Bulk operations
- Searching
- Paging
- Meetings
- Contacts
- Extended properties
- Attachments
- Recurring calendar items
- Message timestamp fields
- Out of Facility (OOF)
- Mail tips
- Delegate information
- Inbox Rules
- Export and upload
- Synchronization, subscriptions and notifications
- Non-account services
- Troubleshooting
- Tests
- Contributing
Installation
You can install this package from PyPI:
pip install exchangelib
The default installation does not support Kerberos, MSAL or SSPI authentication. For additional support for these,
install with the extra kerberos, msal or sspi dependencies (please note that SSPI is only supported on
Windows):
pip install exchangelib[kerberos]
pip install exchangelib[msal]
pip install exchangelib[sspi]
To get all of the above, install as:
pip install exchangelib[complete]
To install the very latest code, install directly from GitHub instead:
pip install git+https://github.com/ecederstrand/exchangelib.git
This package uses the lxml package, and pykerberos to support Kerberos authentication.
To be able to install these, you may need to install some additional operating system packages.
On Ubuntu:
apt-get install libxml2-dev libxslt1-dev

# For Kerberos support, also install these:
apt-get install libkrb5-dev build-essential libssl-dev libffi-dev python-dev
On CentOS:
# For Kerberos support, install these:
yum install gcc python-devel krb5-devel krb5-workstation python-devel
On FreeBSD, pip needs a little help:
pkg install libxml2 libxslt
CFLAGS=-I/usr/local/include pip install lxml

# For Kerberos support, also install these:
pkg install krb5
CFLAGS=-I/usr/local/include pip install kerberos pykerberos
For other operating systems, please consult the documentation for the Python package that fails to install.
Setup and connecting
First, specify your credentials. Username is usually in WINDOMAIN\username format,
where WINDOMAIN is the name of the Windows Domain your username is connected
to, but some servers also accept usernames in PrimarySMTPAddress
(myusername@example.com) format (Office365 requires it). UPN format is also
supported, if your server expects that.
from exchangelib import Credentials

credentials = Credentials(username="MYWINDOMAIN\\myuser", password="topsecret")
# For Office365
credentials = Credentials(username="myuser@example.com", password="topsecret")
If you’re running long-running jobs, you may want to enable fault-tolerance. Fault-tolerance means that requests to the server do an exponential backoff and sleep for up to a certain threshold before giving up, if the server is unavailable or responding with error messages. This prevents automated scripts from overwhelming a failing or overloaded server, and hides intermittent service outages that often happen in large Exchange installations.
An Account is the account on the Exchange server that you want to connect to. This can be the account associated with the credentials you connect with, or any other account on the server that you have been granted access to. If, for example, you want to access a shared folder, create an Account instance using the email address of the account that the shared folder belongs to, and access the shared folder through this account.
primary_smtp_address is the primary SMTP address assigned the account. If
you enable autodiscover, an alias address will work, too. In this case,
Account.primary_smtp_address will be set to the primary SMTP address.
from exchangelib import DELEGATE, IMPERSONATION, Account

my_account = Account(
    primary_smtp_address="myusername@example.com",
    credentials=credentials,
    autodiscover=True,
    access_type=DELEGATE,
)
johns_account = Account(
    primary_smtp_address="john@example.com",
    credentials=credentials,
    autodiscover=True,
    access_type=DELEGATE,
)
marys_account = Account(
    primary_smtp_address="mary@example.com",
    credentials=credentials,
    autodiscover=True,
    access_type=DELEGATE,
)
still_marys_account = Account(
    primary_smtp_address="alias_for_mary@example.com",
    credentials=credentials,
    autodiscover=True,
    access_type=DELEGATE,
)

# Full autodiscover data is available on the Account object:
my_account.ad_response

# Set up a target account and do an autodiscover lookup to find the EWS endpoint
account = Account(
    primary_smtp_address="john@example.com",
    credentials=credentials,
    autodiscover=True,
    access_type=DELEGATE,
)

# If your credentials have been given impersonation access to the target
# account, set a different 'access_type':
johns_account = Account(
    primary_smtp_address="john@example.com",
    credentials=credentials,
    autodiscover=True,
    access_type=IMPERSONATION,
)
If you want to impersonate an account and access a shared folder that this account has access to, you need to specify the email address of the shared folder to access the folder:
from exchangelib.folders import Calendar, Folder, SingleFolderQuerySet
from exchangelib.properties import DistinguishedFolderId, Mailbox

shared_calendar = SingleFolderQuerySet(
    account=johns_account,
    folder=Folder(
        root=johns_account.root,
        _distinguished_id=DistinguishedFolderId(
            id=Calendar.DISTINGUISHED_FOLDER_ID,
            mailbox=Mailbox(email_address="mary@example.com"),
        ),
    ),
).resolve()
Autodiscover needs to make some DNS queries. We use the dnspython package for that. Here’s an example of customizing the way the dns.resolver.Resolver object is created:
from exchangelib.autodiscover import Autodiscovery

Autodiscovery.DNS_RESOLVER_ATTRS["edns"] = False  # Disable EDNS queries
Optimizing connections
According to MSDN docs, you can avoid a per-request AD lookup if you specify the UPN or SID of the account when you are using impersonation. To do this, set one of these values. EWS cannot provide you with these values - you have to fetch them by some other means, e.g. via AD lookup:
account = Account(...)
account.identity.sid = "S-my-sid"
account.identity.upn = "john@subdomain.example.com"
If the server doesn’t support autodiscover, or you want to avoid the overhead of autodiscover, use a Configuration object to set the hostname instead:
from exchangelib import Configuration, Credentials

credentials = Credentials(...)
config = Configuration(server="mail.example.com", credentials=credentials)
For accounts that are known to be hosted on Office365, there’s no need to use autodiscover. Here’s the server to use for Office365:
config = Configuration(server="outlook.office365.com", credentials=credentials)
account = Account(
    primary_smtp_address="john@example.com",
    config=config,
    autodiscover=False,
    access_type=DELEGATE,
)
We will attempt to guess the server version and authentication method automatically. If you have a really bizarre or locked-down installation and the guessing fails, or you want to avoid the extra network traffic, you can set the auth method and version explicitly instead:
from exchangelib import Build, NTLM

version = Version(build=Build(15, 0, 12, 34))
config = Configuration(
    server="example.com", credentials=credentials, version=version, auth_type=NTLM
)
By default, only one single connection to the server is created. If you are using threads to send multiple requests concurrently, you may want to increase this limit. The Exchange server may have rate-limiting policies in place for the connecting credentials, so make sure to agree with your Exchange admins before increasing this value.
config = Configuration(server="mail.example.com", max_connections=10)
Fault tolerance
By default, we fail on all exceptions from the server. If you want to enable fault tolerance, add a retry policy to your configuration. We will then retry on certain transient errors. By default, we back off exponentially and retry for up to an hour. This is configurable:
from exchangelib import Account, FaultTolerance, Configuration, Credentials

credentials = Credentials(...)
config = Configuration(
    retry_policy=FaultTolerance(max_wait=3600), credentials=credentials
)
account = Account(primary_smtp_address="john@example.com", config=config)
Autodiscovery will also use this policy, but only for the final autodiscover endpoint. Here’s how to change the policy for connecting to autodiscover candidate servers.
from exchangelib.autodiscover import Autodiscovery

Autodiscovery.INITIAL_RETRY_POLICY = FaultTolerance(max_wait=30)
Kerberos and SSPI authentication
Kerberos and SSPI authentication are supported via the GSSAPI and SSPI auth types.
from exchangelib import Configuration, GSSAPI, SSPI

config = Configuration(auth_type=GSSAPI)
config = Configuration(auth_type=SSPI)
Certificate Based Authentication (CBA)
from exchangelib import Configuration, BaseProtocol, CBA, TLSClientAuth

TLSClientAuth.cert_file = "/path/to/client.pem"
BaseProtocol.HTTP_ADAPTER_CLS = TLSClientAuth
config = Configuration(auth_type=CBA)
OAuth authentication
OAuth is supported via the OAUTH2 auth type and the OAuth2Credentials class. Use OAuth2AuthorizationCodeCredentials instead for the authorization code flow (useful for applications that access multiple accounts).
from exchangelib import OAuth2Credentials

credentials = OAuth2Credentials(
    client_id="MY_ID", client_secret="MY_SECRET", tenant_id="TENANT_ID"
)
If you need to support legacy password-based authentication using OAuth and delegated permissions, use the OAuth2LegacyCredentials class instead:
from exchangelib import OAuth2LegacyCredentials

credentials = OAuth2LegacyCredentials(
    client_id="MY_ID",
    client_secret="MY_SECRET",
    tenant_id="TENANT_ID",
    username="myuser@example.com",
    password="topsecret",
)
config = Configuration(credentials=credentials, ...)
account = Account("myuser@example.com", config=config, access_type=DELEGATE)
The OAuth2 flow may need to have impersonation headers set. If you get impersonation errors, add information about the account that the OAuth2 credentials was created for:
from exchangelib import (
    Configuration,
    OAuth2Credentials,
    OAuth2AuthorizationCodeCredentials,
    Identity,
    OAUTH2,
)
from oauthlib.oauth2 import OAuth2Token

credentials = OAuth2Credentials(
    ..., identity=Identity(primary_smtp_address="svc_acct@example.com")
)
credentials = OAuth2AuthorizationCodeCredentials(
    ..., identity=Identity(upn="svc_acct@subdomain.example.com")
)

credentials = OAuth2AuthorizationCodeCredentials(
    client_id="MY_ID", client_secret="MY_SECRET", authorization_code="AUTH_CODE"
)
credentials = OAuth2AuthorizationCodeCredentials(
    client_id="MY_ID",
    client_secret="MY_SECRET",
    access_token=OAuth2Token(access_token="EXISTING_TOKEN"),
)
config = Configuration(credentials=credentials, auth_type=OAUTH2)
Applications using the authorization code flow that refreshes access tokens for them probably want to store the refreshed tokens so users don’t have to re-authorize. Subclass OAuth2AuthorizationCodeCredentials and override on_token_auto_refreshed():
class MyCredentials(OAuth2AuthorizationCodeCredentials):
    def on_token_auto_refreshed(self, access_token):
        store_it_somewhere(access_token)
        # Let the object update its internal state!
        super().on_token_auto_refreshed(access_token)
For applications that use the authorization code flow and rely on an external
provider to refresh access tokens (and thus are unable to provide a client ID
and secret to this package), subclass OAuth2AuthorizationCodeCredentials and
override refresh().
class MyCredentials(OAuth2AuthorizationCodeCredentials):
    def refresh(self):
        self.access_token = ...
Impersonation OAuth on Office 365
Office 365 is deprecating Basic authentication and switching to MFA for end
users and OAuth for everything else. Here’s one way to set up an app in Azure
that can access accounts in your organization using impersonation - i.e. access
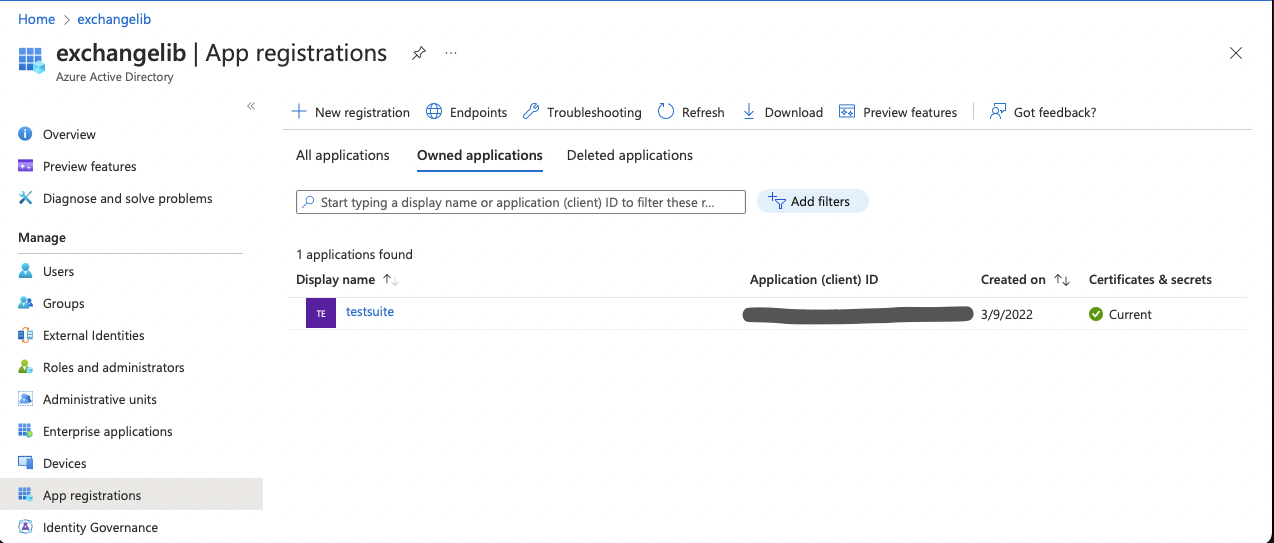
to multiple acounts on behalf of those users. First, log into the
Microsoft 365 Administration page. Find the link
to Azure Active Directory. Select App registrations in the menu and then
New registration. Enter an app name and press Register:
On the next page, note down the Directory (tenant) ID and Application (client)
ID, create a secret using the Add a certificate or secret link, and note down
the Value (client secret) as well.
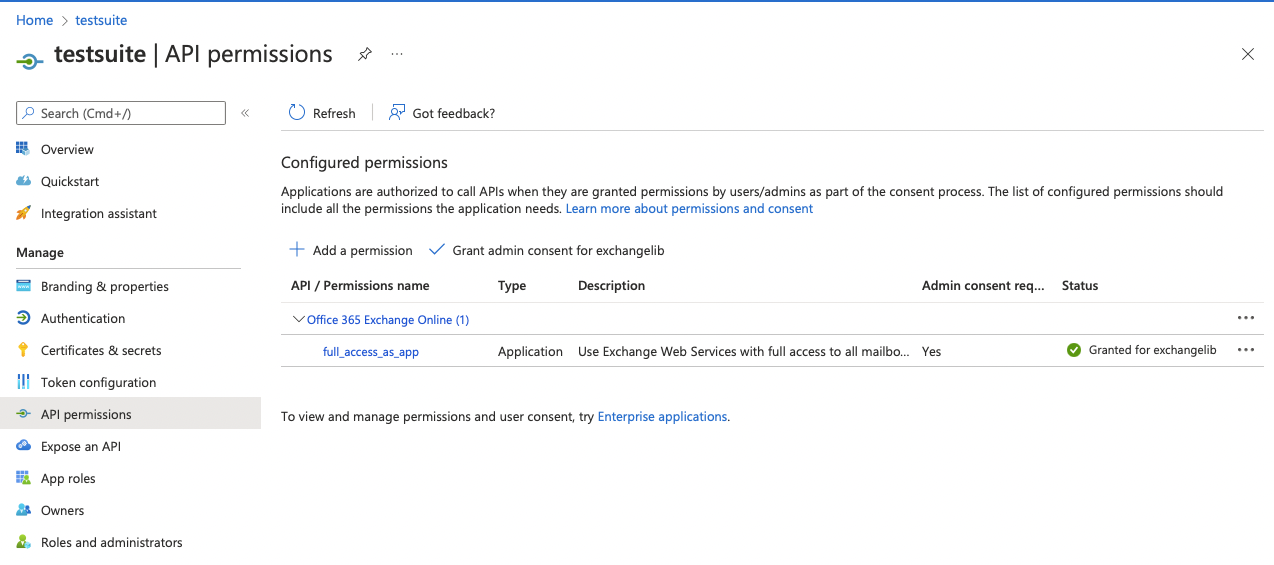
Continue to the App registraions menu item, select your new app, select the
API permissions menu item, Select Add permission and then
APIs my organization uses and search for Office 365 Exchange Online. Select
that API, then Application permissions and add the full_access_as_app
permission:
Finally, continue to the Enterprise applications page, select your new app,
continue to the Permissions page, and check that your app has the
full_access_as_app permission:
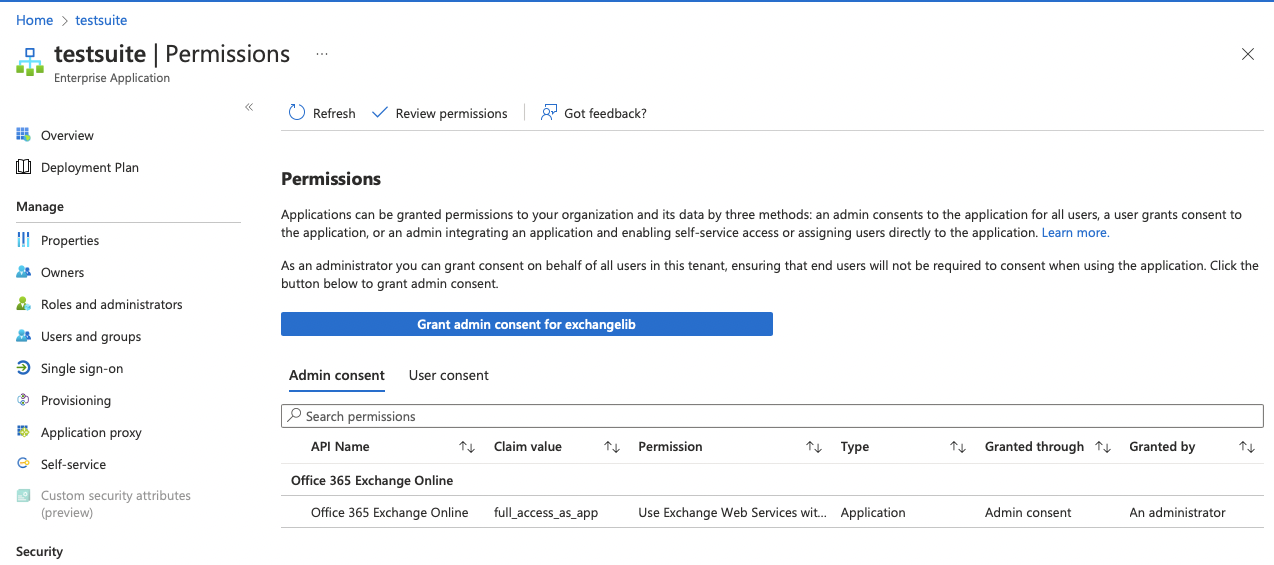
If not, press Grant admin consent for testsuite and grant access.
You should now be able to connect to an account using the OAuth2Credentials
class as shown above.
Delegate OAuth on Office 365
If you only want to access a single account on Office 365, delegate access is
a more suitable access level. Here’s one way to set up an app in Azure
that can access accounts in your organization using delegation - i.e. access
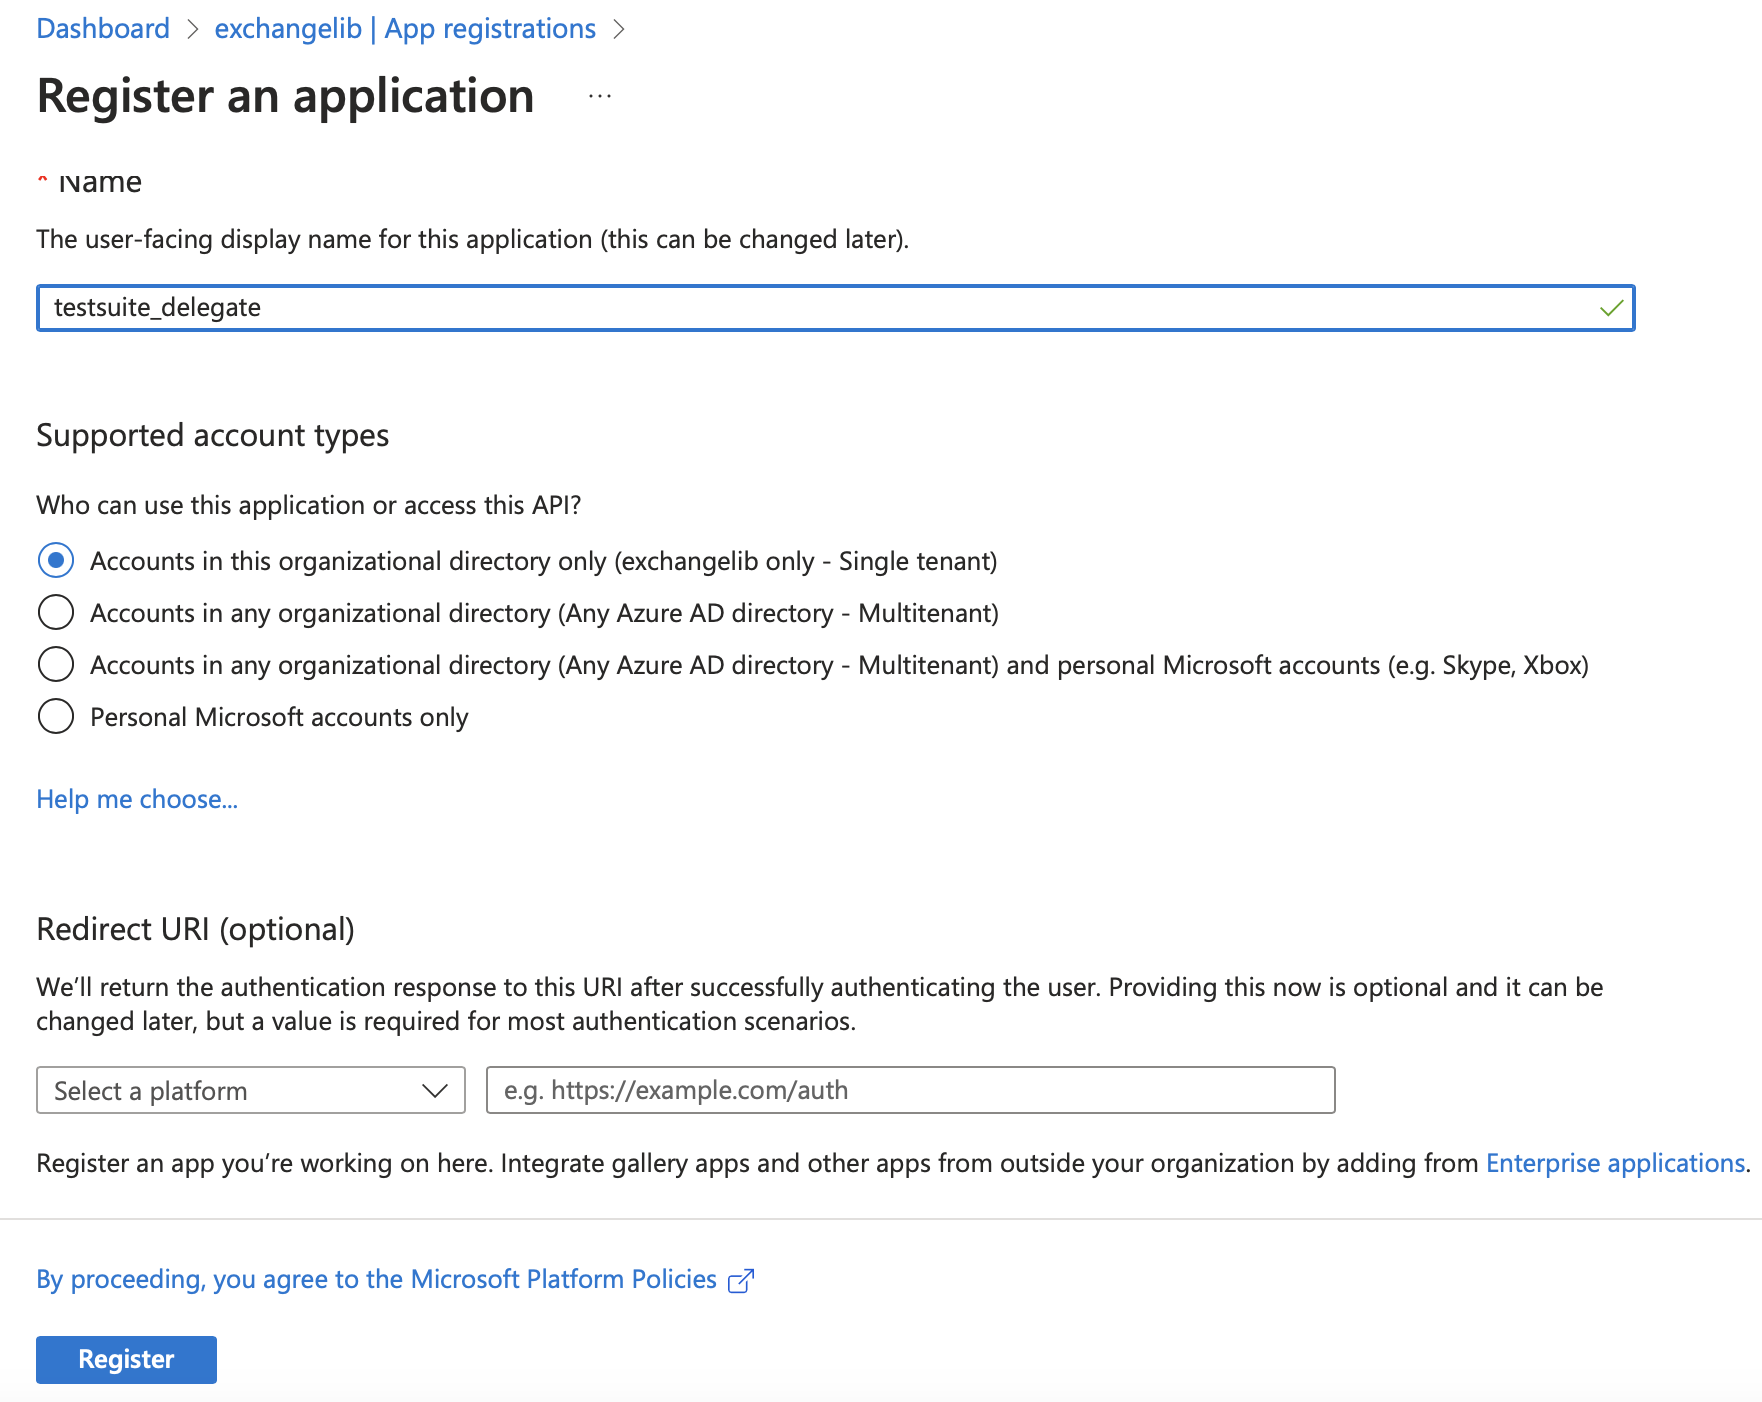
to the same account that you are logging in as. First, log into the
Microsoft 365 Administration page. Find the link
to Azure Active Directory. Select App registrations in the menu and then
New registration. Enter an app name and press Register:
On the next page, note down the Directory (tenant) ID and Application (client)
ID, create a secret using the Add a certificate or secret link, and note down
the Value (client secret) as well.
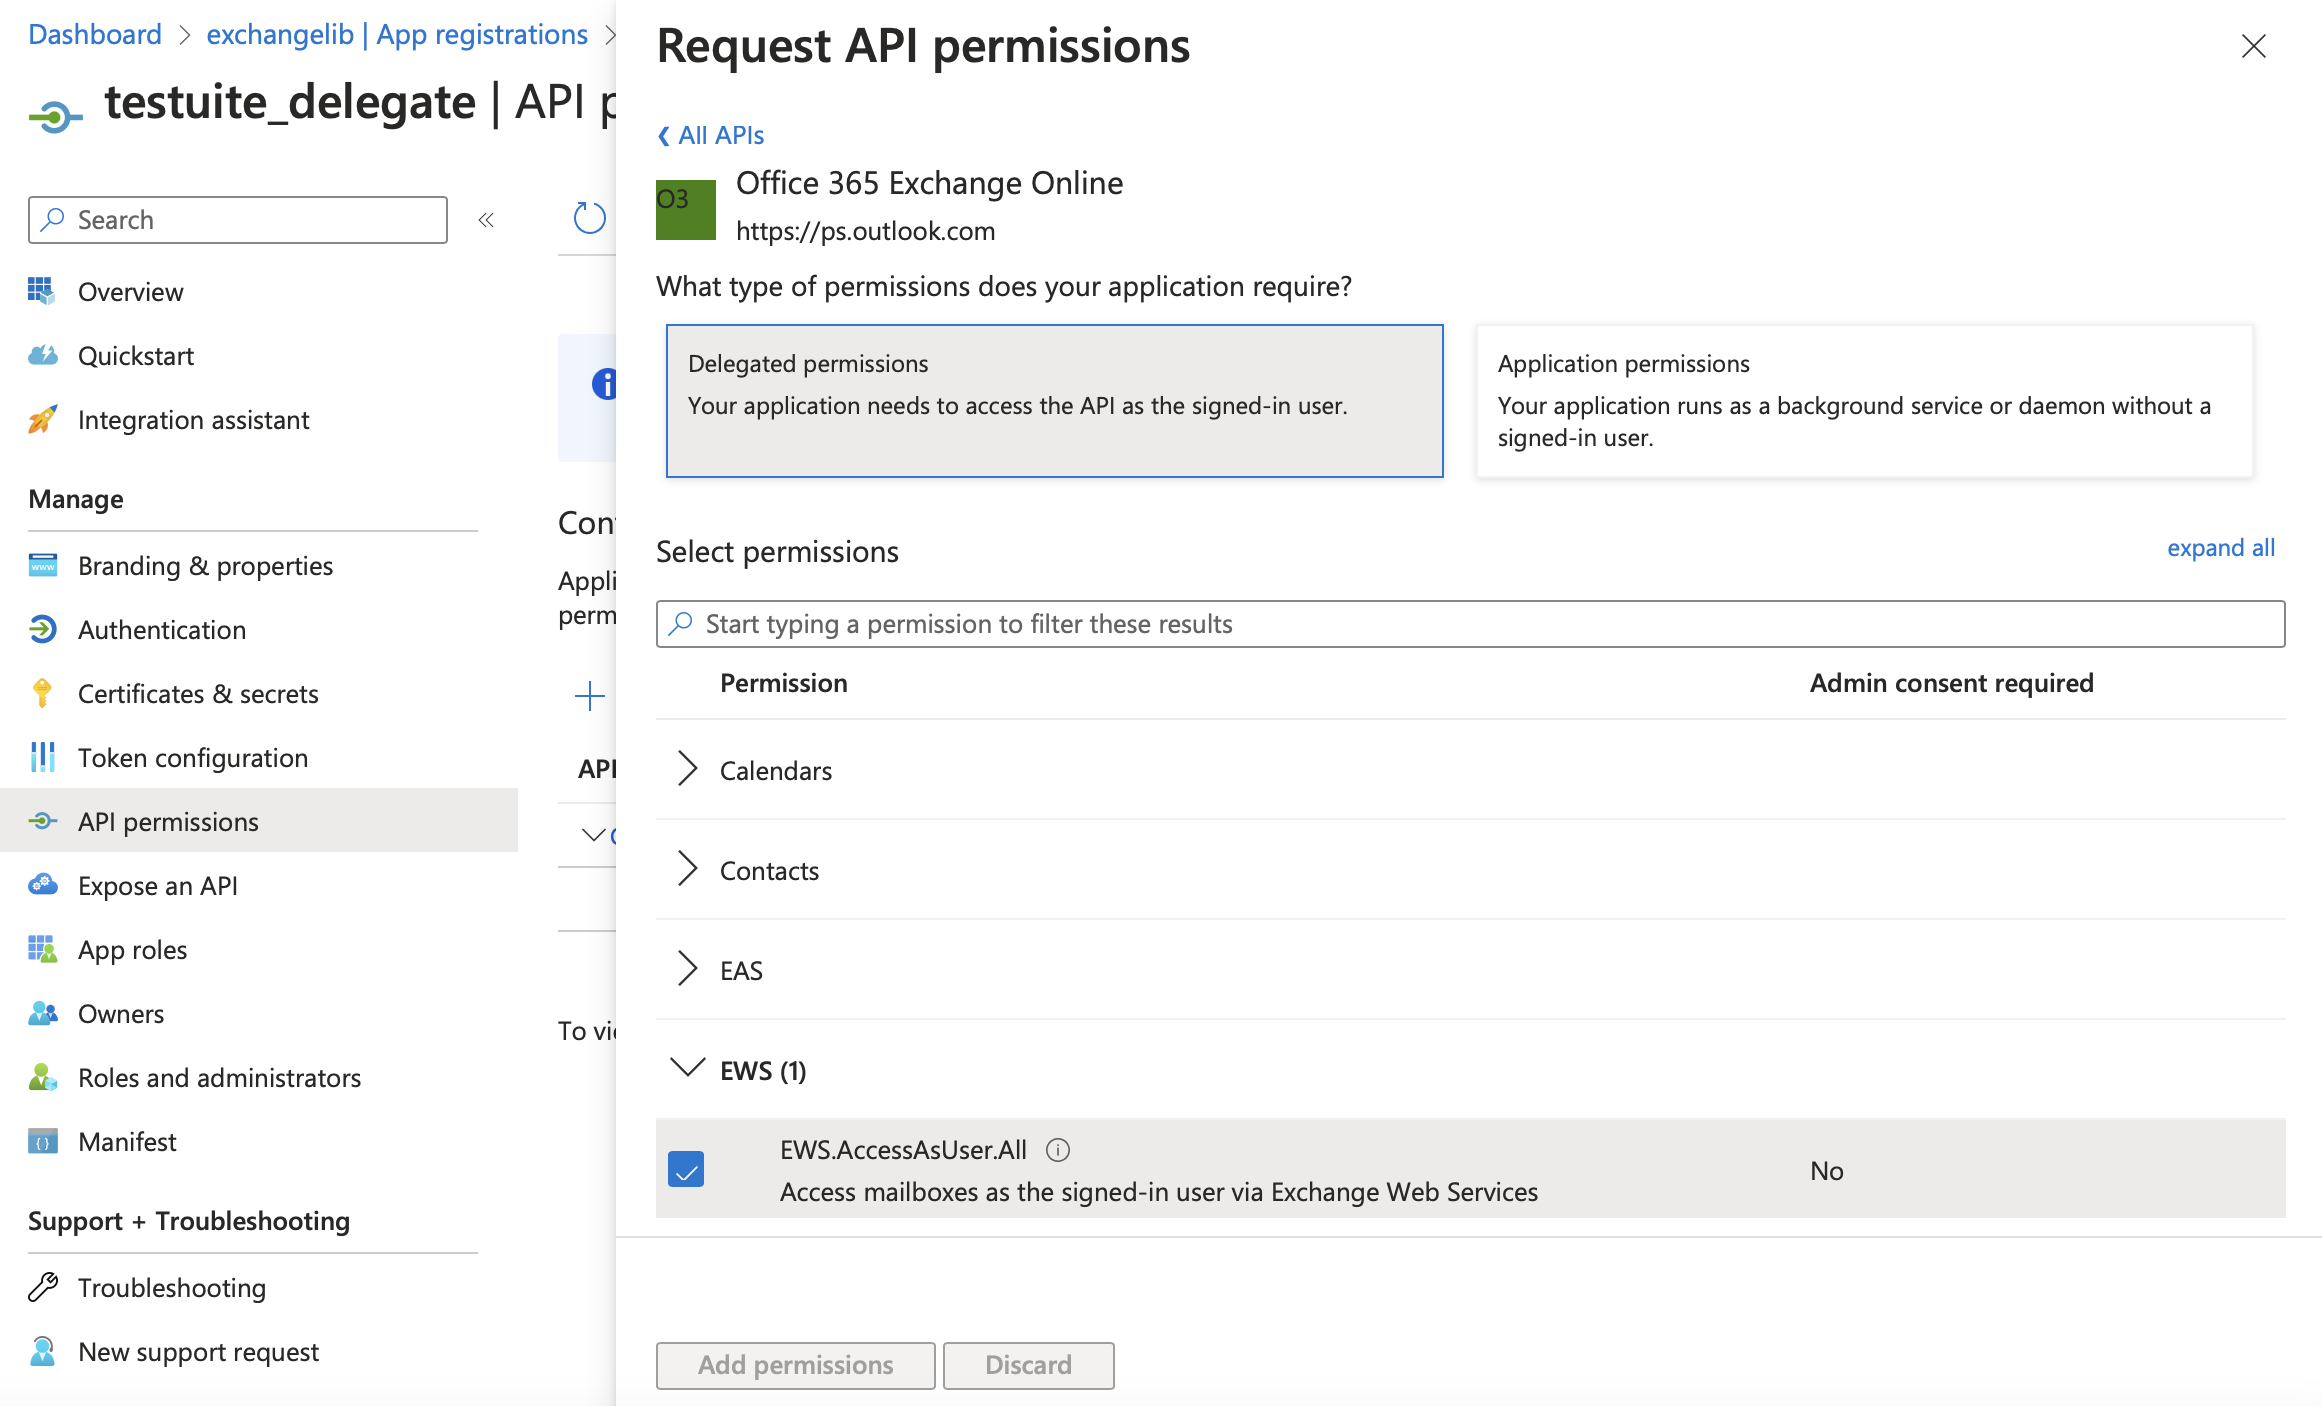
Continue to the App registraions menu item, select your new app, select the
API permissions menu item, Select Add permission and then
APIs my organization uses and search for Office 365 Exchange Online. Select
that API and then Delegated permissions and add the EWS.AccessAsUser.All
permission under the EWS section:
Finally, continue to the Enterprise applications page, select your new app,
continue to the Permissions page, and check that your app has the
EWS.AccessAsUser.All permission:
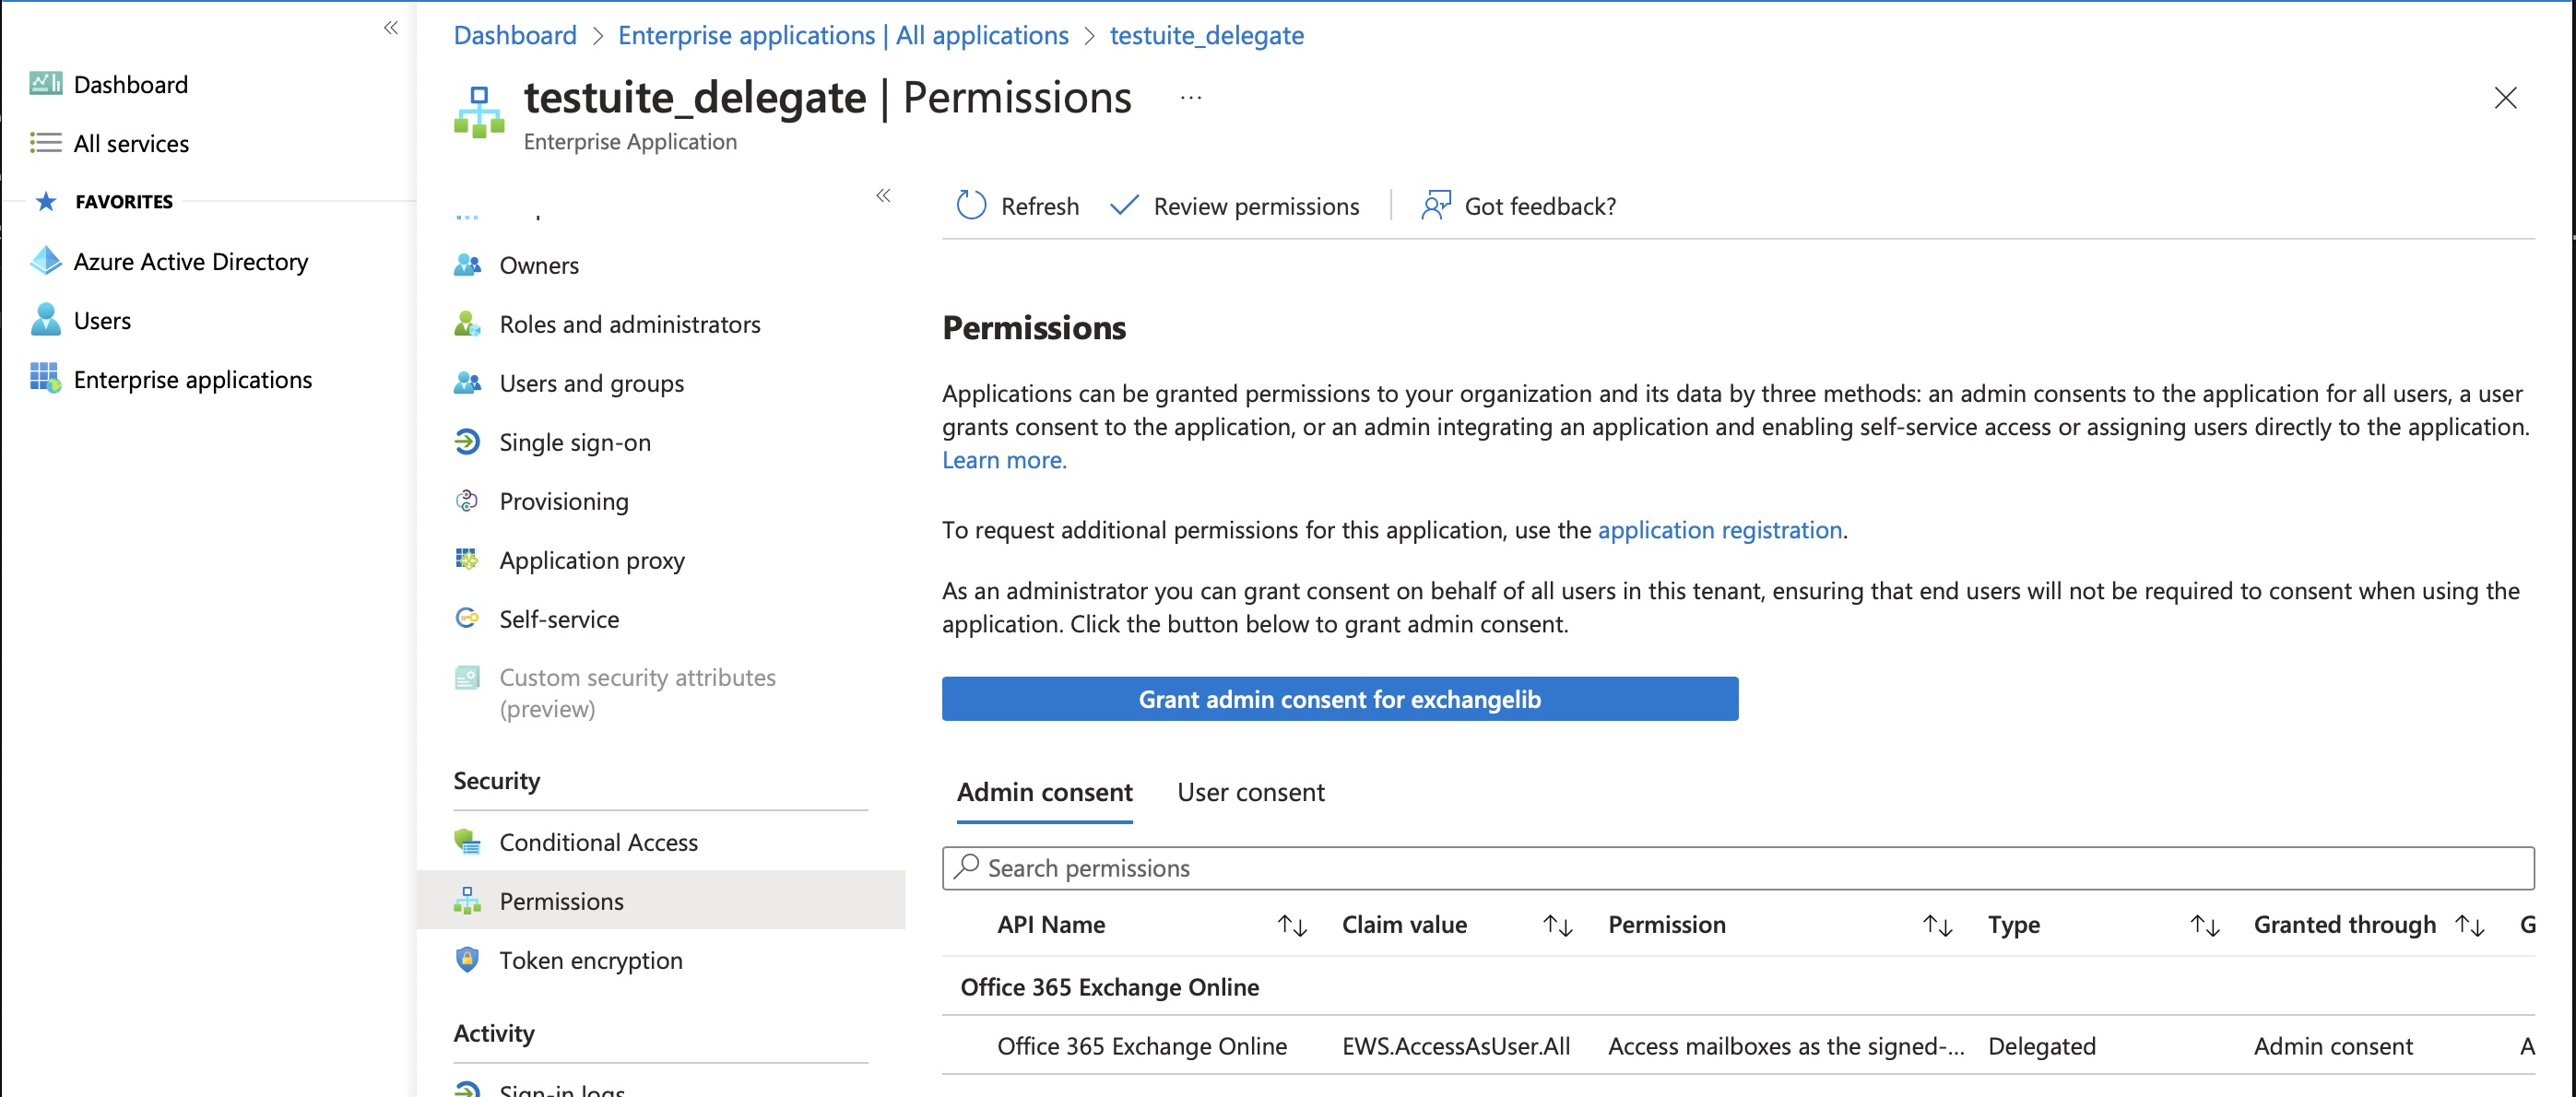
If not, press Grant admin consent for testsuite_delegate and grant access.
You should now be able to connect to an account using the
OAuth2LegacyCredentials class as shown above.
MSAL on Office 365
The Microsoft Authentication Library supports obtaining OAuth tokens via a range of different methods. You can use MSAL to fetch a token valid for EWS and then only provide the token to this library.
Note that MSAL is not supported by default. See Installation for installing with MSAL support.
In this example, we’ll do an interactive login using a browser window, so you can use the login method supported by your organization, and take advantage of any SSO available to your browser. There are example scripts for other flows available at https://github.com/AzureAD/microsoft-authentication-library-for-python/tree/dev/sample.
First, create an app in Azure with EWS.AccessAsUser.All delegate permissions,
as described in the section above, except you don’t need to create a client
secret, and you need to add a “Mobile and Desktop application”
Redirect URI set to http://localhost. Note down the client ID. Then connect
using the following code:
# Script adapted from https://github.com/AzureAD/microsoft-authentication-library-for-python/blob/dev/sample/interactive_sample.py
from exchangelib import DELEGATE, Account, O365InteractiveConfiguration

a = Account(
    primary_smtp_address="MY_ACCOUNT@example.com",
    config=O365InteractiveConfiguration(
        client_id="MY_CLIENT_ID", username="MY_ACCOUNT@example.com"
    ),
    access_type=DELEGATE,
    autodiscover=False,
)
print(a.root.tree())
Caching autodiscover results
If you’re connecting to the same account very often, you can cache the autodiscover result for later so you can skip the autodiscover lookup:
from exchangelib import Configuration, Credentials, Account, DELEGATE

account = Account(...)
ews_url = account.protocol.service_endpoint
ews_auth_type = account.protocol.auth_type
primary_smtp_address = account.primary_smtp_address
# This one is optional. It is used as a hint to the initial connection and
# avoids one or more roundtrips to guess the correct Exchange server version.
version = account.version

# You can now create the Account without autodiscovery, using the cached values:
credentials = Credentials(...)
config = Configuration(
    service_endpoint=ews_url,
    credentials=credentials,
    auth_type=ews_auth_type,
    version=version,
)
account = Account(
    primary_smtp_address=primary_smtp_address,
    config=config,
    autodiscover=False,
    access_type=DELEGATE,
)
Autodiscover can take a lot of time, specially the part that figures out the autodiscover server to contact for a specific email domain. For this reason, we will create a persistent, per-user, on-disk cache containing a map of previous, successful domain -> autodiscover server lookups. This cache is shared between processes and is not deleted when your program exits.
A cache entry for a domain is removed automatically if autodiscovery fails for an email in that domain. It’s possible to clear the entire cache completely if you want:
from exchangelib.autodiscover import clear_cache

clear_cache()
Proxies and custom TLS validation
If you need proxy support or custom TLS validation, you can supply a custom ‘requests’ transport adapter class, as described in http://docs.python-requests.org/en/master/user/advanced/#transport-adapters.
Here’s an example using different custom root certificates depending on the server to connect to:
from urllib.parse import urlparse
import requests.adapters
from exchangelib.protocol import BaseProtocol


class RootCAAdapter(requests.adapters.HTTPAdapter):
    """An HTTP adapter that uses a custom root CA certificate at a hard coded
    location.
    """

    def cert_verify(self, conn, url, verify, cert):
        cert_file = {
            "example.com": "/path/to/example.com.crt",
            "mail.internal": "/path/to/mail.internal.crt",
        }[urlparse(url).hostname]
        super().cert_verify(conn=conn, url=url, verify=cert_file, cert=cert)


# Use this adapter class instead of the default
BaseProtocol.HTTP_ADAPTER_CLS = RootCAAdapter
Here’s an example of adding proxy support:
import requests.adapters
from exchangelib.protocol import BaseProtocol


class ProxyAdapter(requests.adapters.HTTPAdapter):
    def send(self, *args, **kwargs):
        kwargs["proxies"] = {
            "http": "http://10.0.0.1:1243",
            "https": "http://10.0.0.1:4321",
        }
        return super().send(*args, **kwargs)


# Use this adapter class instead of the default
BaseProtocol.HTTP_ADAPTER_CLS = ProxyAdapter
A sample adapter is provided which ignores TLS validation errors. Use at own risk.
from exchangelib.protocol import BaseProtocol, NoVerifyHTTPAdapter

# Use this adapter class instead of the default
BaseProtocol.HTTP_ADAPTER_CLS = NoVerifyHTTPAdapter
User-Agent
You can supply a custom ‘User-Agent’ for your application.
The default is exchangelib/<version> (python-requests/<version>)
Here’s an example using different User-Agent:
from exchangelib.protocol import BaseProtocol

# Use this user-agent instead of the default
BaseProtocol.USERAGENT = "Auto-Reply/0.1.0"
Folders
All wellknown folders are available as properties on the account, e.g. as account.root, account.calendar,
account.trash, account.inbox, account.outbox, account.sent, account.junk, account.tasks and
account.contacts.
There are multiple ways of navigating the folder tree and searching for folders. Globbing and absolute path may create unexpected results if your folder names contain slashes.
The folder structure is cached after first access to a folder hierarchy. This means that external changes to the folder structure will not show up until you clear the cache. Here’s how to clear the cache of each of the currently supported folder hierarchies:
from exchangelib import Account

a = Account(...)
a.root.refresh()
a.public_folders_root.refresh()
a.archive_root.refresh()

some_folder = a.root / "Some Folder"
some_folder.parent
some_folder.parent.parent.parent
# Returns the root of the folder structure, at any level. Same as Account.root
some_folder.root
some_folder.children  # A generator of child folders
some_folder.absolute  # Returns the absolute path, as a string
# A generator returning all subfolders at arbitrary depth this level
some_folder.walk()
# Globbing uses the normal UNIX globbing syntax, but case-insensitive
some_folder.glob("foo*")  # Return child folders matching the pattern
some_folder.glob("*/foo")  # Return subfolders named 'foo' in any child folder
some_folder.glob("**/foo")  # Return subfolders named 'foo' at any depth
some_folder / "sub_folder" / "even_deeper" / "leaf"  # Works like pathlib.Path
You can also drill down into the folder structure without using the cache. This works like the single slash syntax, but does not start by creating a cache the folder hierarchy. This is useful if your account contains a huge number of folders, and you already know where to go.
some_folder // "sub_folder" // "even_deeper" // "leaf"
some_folder.parts  # returns some_folder and all parents, as Folder instances
some_folder.absolute  # Returns the full path as a string
tree() returns a string representation of the tree structure at a given level
print(a.root.tree())
"""
root
├── inbox
│   └── todos
└── archive
    ├── Last Job
    ├── GitLab issues
    └── Mom
"""
Folders have some useful counters:
a.inbox.total_count
a.inbox.child_folder_count
a.inbox.unread_count
# Update the counters
a.inbox.refresh()
Folders can be created, updated and deleted:
from exchangelib import Folder

f = Folder(parent=a.inbox, name="My New Folder")
f.save()

f.name = "My New Subfolder"
f.save()
f.delete()

# Delete all items in a folder
f.empty()
# Also delete all subfolders in the folder
f.empty(delete_sub_folders=True)
# Recursively delete all items in a folder, and all subfolders and their
# content. This is like `empty(delete_sub_folders=True)` but attempts to protect
# distinguished folders from being deleted. Use with caution!
f.wipe()
Folders support getting, creating, updating and deleting Master Category Lists, also known as User Configuration objects. Supported key and value types for the ‘dictionary’ attribute are: bool, int, bytes, str, tuples of str, datetime, EWSDateTime, and the ‘Byte’ type which we emulate in Python as a 1-length bytes.
f.create_user_configuration(
    name="SomeName",
    dictionary={"foo": "bar", 123: "a", "b": False},
    xml_data=b"<foo>bar</foo>",
    binary_data=b"XXX",
)

config = f.get_user_configuration(name="SomeName")
config.dictionary  # {'foo': 'bar', 123: 'a', 'b': False}
config.xml_data  # b'<foo>bar</foo>'
config.binary_data  # b'XXX'

f.update_user_configuration(
    name="SomeName",
    dictionary={"bar": "foo", 456: "a", "b": True},
    xml_data=b"<foo>baz</foo>",
    binary_data=b"YYY",
)

f.delete_user_configuration(name="SomeName")
Dates, datetimes and timezones
EWS has some special requirements on datetimes and timezones. You may
use regular datetime.* and zoneinfo objects as input, but all methods
return date values as the special EWSDate, EWSDateTime and EWSTimeZone
classes. Thes classes are all subclasses of datetime.* or zoneinfo.ZoneInfo
so you should be able to use them as regular date objects.
import zoneinfo
from datetime import datetime, timedelta
import dateutil.tz
import pytz
from exchangelib import EWSTimeZone, EWSDateTime, EWSDate, UTC, UTC_NOW

# EWSTimeZone works just like zoneinfo.ZoneInfo()
tz = EWSTimeZone("Europe/Copenhagen")
# You can also get the local timezone defined in your operating system
tz = EWSTimeZone.localzone()

# EWSDate and EWSDateTime work just like datetime.datetime and datetime.date.
# Always create timezone-aware datetimes:
localized_dt = EWSDateTime(2017, 9, 5, 8, 30, tzinfo=tz)
right_now = EWSDateTime.now(tz)

# Datetime math works transparently
two_hours_later = localized_dt + timedelta(hours=2)
two_hours = two_hours_later - localized_dt
two_hours_later += timedelta(hours=2)

# Dates
my_date = EWSDate(2017, 9, 5)
today = EWSDate.today()
also_today = right_now.date()
also_today += timedelta(days=10)

# UTC helpers. 'UTC' is the UTC timezone as an EWSTimeZone instance.
# 'UTC_NOW' returns a timezone-aware UTC timestamp of current time.
right_now_in_utc = EWSDateTime.now(tz=UTC)
right_now_in_utc = UTC_NOW()

# 'pytz', 'dateutil' and `zoneinfo` timezones can be converted to EWSTimeZone
pytz_tz = pytz.timezone("Europe/Copenhagen")
tz = EWSTimeZone.from_timezone(pytz_tz)
dateutil_tz = dateutil.tz.gettz("Europe/Copenhagen")
tz = EWSTimeZone.from_timezone(dateutil_tz)
zoneinfo_tz = zoneinfo.ZoneInfo("Europe/Copenhagen")
tz = EWSTimeZone.from_timezone(zoneinfo_tz)

# Python datetime objects can be converted using from_datetime(). Make sure
# values are timezone-aware and tzinfo is an EWSTimeZone or ZoneInfo instance.
py_dt = datetime(2017, 12, 11, 10, 9, 8, tzinfo=tz)
ews_now = EWSDateTime.from_datetime(py_dt)
Creating, updating, deleting, sending, moving, archiving, marking as junk
Here’s an example of creating a calendar item in the user’s standard calendar.
from exchangelib import Account, CalendarItem
from exchangelib.items import SEND_ONLY_TO_ALL, SEND_ONLY_TO_CHANGED
from exchangelib.properties import DistinguishedFolderId

a = Account(...)
item = CalendarItem(folder=a.calendar, subject="foo")
item.save()  # This gives the item an 'id' and a 'changekey' value
# Send a meeting invitation to attendees
item.save(send_meeting_invitations=SEND_ONLY_TO_ALL)
# Update a field. All fields have a corresponding Python type that must be used.
item.subject = "bar"
item.save()  # When the items has an item_id, this will update the item
# Only updates certain fields. Accepts a list of field names.
item.save(update_fields=["subject"])
# Send invites only to attendee changes
item.save(send_meeting_invitations=SEND_ONLY_TO_CHANGED)
item.delete()  # Hard deletion
# Send cancellations to all attendees
item.delete(send_meeting_cancellations=SEND_ONLY_TO_ALL)
item.soft_delete()  # Delete, but keep a copy in the recoverable items folder
item.move_to_trash()  # Move to the trash folder
item.move(a.trash)  # Also moves the item to the trash folder
item.copy(a.trash)  # Creates a copy of the item to the trash folder
# Archives the item to inbox of the archive mailbox
item.archive(DistinguishedFolderId("inbox"))
# Block sender and move item to junk folder
item.mark_as_junk(is_junk=True, move_item=True)
Here’s how to print all available fields on the CalendarItem class. Beware
that some fields are read-only, or read-only after the item has been saved or
sent, and some fields are not supported on old versions of Exchange.
print(CalendarItem.FIELDS)
You can also send emails. If you don’t want a local copy:
from exchangelib import Message, Mailbox

m = Message(
    account=a,
    subject="Daily motivation",
    body="All bodies are beautiful",
    to_recipients=[
        Mailbox(email_address="anne@example.com"),
        Mailbox(email_address="bob@example.com"),
    ],
    # Simple strings work, too
    cc_recipients=["carl@example.com", "denice@example.com"],
    bcc_recipients=[
        Mailbox(email_address="erik@example.com"),
        "felicity@example.com",
    ],  # Or a mix of both
)
m.send()
Or, if you want a copy in e.g. the ‘Sent’ folder
m = Message(
    account=a,
    folder=a.sent,
    subject="Daily motivation",
    body="All bodies are beautiful",
    to_recipients=[Mailbox(email_address="anne@example.com")],
)
m.send_and_save()
Likewise, you can reply to and forward messages that are stored in your mailbox (i.e. they have an item ID).
m = a.sent.get(subject="Daily motivation")
m.reply(
    subject="Re: Daily motivation",
    body="I agree",
    to_recipients=["carl@example.com", "denice@example.com"],
)
m.reply_all(subject="Re: Daily motivation", body="I agree")
m.forward(
    subject="Fwd: Daily motivation",
    body="Hey, look at this!",
    to_recipients=["carl@example.com", "denice@example.com"],
)
You can also edit a draft of a reply or forward
from exchangelib import FileAttachment

save_result = m.create_forward(
    subject="Fwd: Daily motivation",
    body="Hey, look at this!",
    to_recipients=["erik@cederstrand.dk"],
).save(
    a.drafts
)  # gives you back a BulkCreateResult containing the ID and changekey
forward_draft = a.drafts.get(id=save_result.id, changekey=save_result.changekey)
forward_draft.reply_to = ["erik@example.com"]
forward_draft.attach(
    FileAttachment(name="my_file.txt", content="hello world".encode("utf-8"))
)
# Now our forward has an extra reply_to field and an extra attachment.
forward_draft.send()
EWS distinguishes between plain text and HTML body contents. If you want to send HTML body content, use the HTMLBody helper. Clients will see this as HTML and display the body correctly:
from exchangelib import HTMLBody

item.body = HTMLBody("<html><body>Hello happy <blink>OWA user!</blink></body></html>")
Bulk operations
Bulk methods are available to run operations on multiple items at a time. Here’s an example of building a list of calendar items:
import datetime
import zoneinfo
from exchangelib import Account, CalendarItem, Attendee, Mailbox
from exchangelib.properties import DistinguishedFolderId

a = Account(...)
tz = zoneinfo.ZoneInfo("Europe/Copenhagen")
year, month, day = 2016, 3, 20
calendar_items = []
for hour in range(7, 17):
    calendar_items.append(
        CalendarItem(
            start=datetime.datetime(year, month, day, hour, 30, tzinfo=tz),
            end=datetime.datetime(year, month, day, hour + 1, 15, tzinfo=tz),
            subject="Test item",
            body="Hello from Python",
            location="devnull",
            categories=["foo", "bar"],
            required_attendees=[
                Attendee(
                    mailbox=Mailbox(email_address="user1@example.com"),
                    response_type="Accept",
                )
            ],
        )
    )

# Create all items at once
return_ids = a.bulk_create(folder=a.calendar, items=calendar_items)

# Bulk fetch, when you have a list of item IDs and want the full objects.
# Returns a generator.
calendar_ids = [(i.id, i.changekey) for i in calendar_items]
items_iter = a.fetch(ids=calendar_ids)
# If you only want some fields, use the 'only_fields' attribute
items_iter = a.fetch(ids=calendar_ids, only_fields=["start", "subject"])

# Bulk update items. Each item must be accompanied by a list of attributes to
# update.
updated_ids = a.bulk_update(items=[(i, ("start", "subject")) for i in calendar_items])

# Move many items to a new folder
new_ids = a.bulk_move(ids=calendar_ids, to_folder=a.other_calendar)

# Send draft messages in bulk
message_ids = a.drafts.all().only("id", "changekey")
new_ids = a.bulk_send(ids=message_ids, save_copy=False)

# Delete in bulk
delete_results = a.bulk_delete(ids=calendar_ids)

# Archive in bulk
delete_results = a.bulk_archive(
    ids=calendar_ids, to_folder=DistinguishedFolderId("inbox")
)
Bulk operations also work on QuerySet objects. Here’s how to bulk delete messages in the inbox:
a.inbox.filter(subject__startswith="Invoice").delete()

# Likewise, you can bulk send, copy, move or archive items found in a QuerySet
a.drafts.filter(subject__startswith="Invoice").send()
# All kwargs are passed on to the equivalent bulk methods on the Account
a.drafts.filter(subject__startswith="Invoice").send(save_copy=False)
a.inbox.filter(subject__startswith="Invoice").copy(to_folder=a.trash)
a.inbox.filter(subject__startswith="Invoice").move(to_folder=a.trash)
a.inbox.filter(subject__startswith="Invoice").archive(
    to_folder=DistinguishedFolderId("inbox")
)
a.inbox.filter(subject__startswith="Invoice").mark_as_junk(is_junk=True, move_item=True)
Searching
Searching is modeled after the Django QuerySet API, and a large part of the API is supported. Like in Django, the QuerySet is lazy and doesn’t fetch anything before the QuerySet is iterated. QuerySets support chaining, so you can build the final query in multiple steps, and you can re-use a base QuerySet for multiple sub-searches. The QuerySet is an iterator.
Here are some examples of using the API:
import datetime
from exchangelib import Account, Message

a = Account(...)

# Not all fields on an item support searching. Here's the list of options for
# Message items.
print([f.name for f in Message.FIELDS if f.is_searchable])

all_items = a.inbox.all()  # Get everything
all_items_without_caching = a.inbox.all()
# Chain multiple modifiers to refine the query
filtered_items = a.inbox.filter(subject__contains="foo").exclude(
    categories__icontains="bar"
)
# Delete all items returned by the QuerySet
status_report = a.inbox.all().delete()
start = datetime.datetime(2017, 1, 1, tzinfo=a.default_timezone)
end = datetime.datetime(2018, 1, 1, tzinfo=a.default_timezone)
# Filter by a date range
items_for_2017 = a.calendar.filter(start__range=(start, end))
Same as filter() but throws an error if exactly one item isn’t returned
item = a.inbox.get(subject="unique_string")

# If you only have the ID and possibly the changekey of an item, you can get the
# full item:
a.inbox.get(id="AAMkADQy=")
a.inbox.get(id="AAMkADQy=", changekey="FwAAABYA")
You can sort by a single or multiple fields. Prefix a field with ‘-‘ to reverse the sorting. Sorting is efficient since it is done server-side, except when a calendar view sorting on multiple fields.
ordered_items = a.inbox.all().order_by("subject")
reverse_ordered_items = a.inbox.all().order_by("-subject")
# Indexed properties can be ordered on their individual components
sorted_by_home_street = a.contacts.all().order_by(
    "phone_numbers__CarPhone", "physical_addresses__Home__street"
)
# Beware that sorting is done client-side here
a.calendar.view(start=start, end=end).order_by("subject", "categories")
Counting and exists
n = a.inbox.all().count()  # Efficient counting
folder_is_empty = not a.inbox.all().exists()  # Efficient tasting
Restricting returned attributes:
sparse_items = a.inbox.all().only("subject", "start")
# Dig deeper on indexed properties
sparse_items = a.contacts.all().only("phone_numbers")
sparse_items = a.contacts.all().only("phone_numbers__CarPhone")
sparse_items = a.contacts.all().only("physical_addresses__Home__street")
Return values as dicts, nested or flat lists instead of objects:
ids_as_dict = a.inbox.all().values("id", "changekey")
values_as_list = a.inbox.all().values_list("subject", "body")
all_subjects = a.inbox.all().values_list("physical_addresses__Home__street", flat=True)
A QuerySet can be indexed and sliced like a normal Python list. Slicing and indexing of the QuerySet is efficient because it only fetches the necessary items to perform the slicing. Slicing from the end is also efficient, but then you might as well reverse the sorting.
# Efficient. We only fetch 10 items
first_ten = a.inbox.all().order_by("-subject")[:10]
# Efficient, but convoluted
last_ten = a.inbox.all().order_by("-subject")[:-10]
# Efficient. We only fetch 10 items
next_ten = a.inbox.all().order_by("-subject")[10:20]
# Efficient. We only fetch 1 item
single_item = a.inbox.all().order_by("-subject")[34298]
# Efficient. We only fetch 10 items
ten_items = a.inbox.all().order_by("-subject")[3420:3430]
# This is just stupid, but works
random_emails = a.inbox.all().order_by("-subject")[::3]
The syntax for filter() is modeled after Django QuerySet filters. The following filter lookup types are supported. Some lookups only work with string attributes. Range and less/greater operators only work for date or numerical attributes. This is determined by the field type.
Some attributes are not searchable at all via EWS. This is determined by the “is_searchable” attribute on the field.
# List the field name and field type of searchable fields for a given item type
for f in Message.FIELDS:
    if f.is_searchable:
        print(f.name, f)

# No restrictions. Return all items.
qs = a.calendar.all()
# Returns items where subject is exactly 'foo'. Case-sensitive
qs.filter(subject="foo")
# Returns items within range
qs.filter(start__range=(start, end))
# Return items where subject is either 'foo' or 'bar'
qs.filter(subject__in=("foo", "bar"))
# Returns items where subject is not 'foo'
qs.filter(subject__not="foo")
# Returns items starting after 'dt'
qs.filter(start__gt=start)
# Returns items starting on or after 'dt'
qs.filter(start__gte=start)
# Returns items starting before 'dt'
qs.filter(start__lt=start)
# Returns items starting on or before 'dt'
qs.filter(start__lte=start)
# Same as filter(subject='foo')
qs.filter(subject__exact="foo")
# Returns items where subject is 'foo', 'FOO' or 'Foo'
qs.filter(subject__iexact="foo")
# Returns items where subject contains 'foo'
qs.filter(subject__contains="foo")
# Returns items where subject contains 'foo', 'FOO' or 'Foo'
qs.filter(subject__icontains="foo")
# Returns items where subject starts with 'foo'
qs.filter(subject__startswith="foo")
# Returns items where subject starts with 'foo', 'FOO' or 'Foo'
qs.filter(subject__istartswith="foo")
# Returns items that have at least one category assigned, i.e. the field exists
# on the item on the server.
qs.filter(categories__exists=True)
# Returns items that have no categories set, i.e. the field does not exist on
# the item on the server.
qs.filter(categories__exists=False)

# When filtering on indexed properties, you need to specify the full path to the
# value you want to filter on.
a.contacts.filter(phone_numbers__CarPhone="123456")
a.contacts.filter(phone_numbers__CarPhone__contains="123")
a.contacts.filter(physical_addresses__Home__street="Elm Street")
a.contacts.filter(physical_addresses__Home__street__contains="Elm")
WARNING: Filtering on the ‘body’ field is not fully supported by EWS. There seems to be a window before some internal search index is populated where case-sensitive or case-insensitive filtering for substrings in the body element incorrectly returns an empty result, and sometimes the result stays empty.
filter() also supports EWS QueryStrings. Just pass the string to filter().
QueryStrings cannot be combined with other filters. We make no attempt at
validating the syntax of the QueryString - we just pass the string verbatim to
EWS.
Read more about the QueryString syntax here: https://docs.microsoft.com/en-us/exchange/client-developer/web-service-reference/querystring-querystringtype
a.inbox.filter("subject:XXX")
filter() also supports Q objects that are modeled after Django Q objects, for
building complex boolean logic search expressions.
from exchangelib import Q

q = (Q(subject__iexact="foo") | Q(subject__contains="bar")) & ~Q(
    subject__startswith="baz"
)
a.inbox.filter(q)
In this example, we filter by categories so we only get items created by us.
a.calendar.filter(
    start__lt=datetime.datetime(2019, 1, 1, tzinfo=a.default_timezone),
    end__gt=datetime.datetime(2019, 1, 31, tzinfo=a.default_timezone),
    categories__contains=["foo", "bar"],
)
By default, EWS returns only the master recurring item. If you want recurring calendar items to be expanded, use calendar.view(start=…, end=…) instead.
start = datetime.datetime(2019, 1, 31, tzinfo=a.default_timezone)
items = a.calendar.view(
    start=start,
    end=start + datetime.timedelta(days=1),
)
for item in items:
    print(item.start, item.end, item.subject, item.body, item.location)
You can combine view() with other modifiers. For example, to check for conflicts before adding a meeting from 8:00 to 10:00:
has_conflicts = a.calendar.view(
    start=datetime.datetime(2019, 1, 31, 8, tzinfo=a.default_timezone),
    end=datetime.datetime(2019, 1, 31, 10, tzinfo=a.default_timezone),
    max_items=1,
).exists()
The filtering syntax also works on collections of folders, so you can search multiple folders in a single request.
from exchangelib import FolderCollection

a.inbox.children.filter(subject="foo")
a.inbox.walk().filter(subject="foo")
a.inbox.glob("foo*").filter(subject="foo")
# Or select the folders individually
FolderCollection(account=a, folders=[a.inbox, a.calendar]).filter(subject="foo")
Paging
Paging EWS services, e.g. FindItem and FindFolder, have a default page size of 100. This is the
number of items fetched per page when paging is requested. You can change this value globally:
import exchangelib.services

exchangelib.services.EWSService.PAGE_SIZE = 25
Other EWS services like GetItem and GetFolder, have a default chunk size of 100. This value is
used when we request a large number of items and need to split up the requested items into multiple
requests. You can change this value globally:
import exchangelib.services

exchangelib.services.EWSService.CHUNK_SIZE = 25
If you are working with very small or very large items, these may not be a reasonable values. For example, if you want to retrieve and save emails with large attachments, you can change this value on a per-queryset basis:
from exchangelib import Account

a = Account(...)
qs = a.inbox.all().only("mime_content")
qs.page_size = 200  # Number of IDs for FindItem to get per page
qs.chunk_size = 5  # Number of full items for GetItem to request per call
for msg in qs:
    with open("%s.eml" % msg.item_id, "w") as f:
        f.write(msg.mime_content)
You can also change the default page and chunk size of bulk operations via QuerySets:
a.inbox.filter(subject__startswith="Invoice").delete(page_size=1000, chunk_size=100)
Finally, the bulk methods defined on the Account class have an optional chunk_size
argument that you can use to set a non-default page size when fetching, creating, updating
or deleting items.
from exchangelib import Account, Message

a = Account(...)
huge_list_of_items = [Message(...) for i in range(10000)]
return_ids = a.bulk_create(folder=a.inbox, items=huge_list_of_items, chunk_size=5)
Meetings
The CalendarItem class allows you send out requests for meetings that
you initiate or to cancel meetings that you already set out before. It
is also possible to process MeetingRequest messages that are received.
You can reply to these messages using the AcceptItem,
TentativelyAcceptItem and DeclineItem classes. If you receive a
cancellation for a meeting (class MeetingCancellation) that you
already accepted then you can also process these by removing the entry
from the calendar.
import datetime
from exchangelib import Account, CalendarItem
from exchangelib.items import (
    MeetingRequest,
    MeetingCancellation,
    SEND_TO_ALL_AND_SAVE_COPY,
)

a = Account(...)

# create a meeting request and send it out
item = CalendarItem(
    account=a,
    folder=a.calendar,
    start=datetime.datetime(2019, 1, 31, 8, 15, tzinfo=a.default_timezone),
    end=datetime.datetime(2019, 1, 31, 8, 45, tzinfo=a.default_timezone),
    subject="Subject of Meeting",
    body="Please come to my meeting",
    required_attendees=["anne@example.com", "bob@example.com"],
)
item.save(send_meeting_invitations=SEND_TO_ALL_AND_SAVE_COPY)

# cancel a meeting that was sent out using the CalendarItem class
for calendar_item in a.calendar.all().order_by("-datetime_received")[:5]:
    # only the organizer of a meeting can cancel it
    if calendar_item.organizer.email_address == a.primary_smtp_address:
        calendar_item.cancel()

# processing an incoming MeetingRequest
for item in a.inbox.all().order_by("-datetime_received")[:5]:
    if isinstance(item, MeetingRequest):
        item.accept(body="Sure, I'll come")
        # Or:
        item.decline(body="No way!")
        # Or:
        item.tentatively_accept(body="Maybe...")

# meeting requests can also be handled from the calendar - e.g. decline the
# meeting that was received last.
for calendar_item in a.calendar.all().order_by("-datetime_received")[:1]:
    calendar_item.decline()

# processing an incoming MeetingCancellation (also delete from calendar)
for item in a.inbox.all().order_by("-datetime_received")[:5]:
    if isinstance(item, MeetingCancellation):
        if item.associated_calendar_item_id:
            calendar_item = a.inbox.get(
                id=item.associated_calendar_item_id.id,
                changekey=item.associated_calendar_item_id.changekey,
            )
            calendar_item.delete()
        item.move_to_trash()
Contacts
Fetching personas from a contact folder is supported using the same
syntax as folders. Just start your query with .people():
# Navigate to a contact folder and start the search
from exchangelib import Account, DistributionList
from exchangelib.indexed_properties import EmailAddress

a = Account(...)
folder = a.root / "AllContacts"
for p in folder.people():
    print(p)
for p in (
    folder.people()
    .only("display_name")
    .filter(display_name="john")
    .order_by("display_name")
):
    print(p)

# Getting a single contact in the GAL contact list
gal = a.contacts / "GAL Contacts"
contact = gal.get(email_addresses=EmailAddress(email="lucas@example.com"))
# All contacts with a gmail address
gmail_contacts = list(
    gal.filter(email_addresses__contains=EmailAddress(email="gmail.com"))
)
# All Gmail email addresses
gmail_addresses = [
    e.email
    for c in gal.filter(email_addresses__contains=EmailAddress(email="gmail.com"))
    for e in c.email_addresses
]
# All email addresses
all_addresses = [
    e.email
    for c in gal.all()
    for e in c.email_addresses
    if not isinstance(c, DistributionList)
]
Contacts have some special “indexed property” fields that require extra attention. Here’s an
example of creating a new contact with multiple phone numbers and addresses. Each indexed property
class has a LABEL_CHOICES class attribute listing all valid label values:
from exchangelib import Contact
from exchangelib.indexed_properties import PhoneNumber, EmailAddress, PhysicalAddress

contact = Contact(
    account=a,
    folder=a.contacts,
    given_name="Test",
    surname="Lockt",
    display_name="Test Lockt",
    phone_numbers=[
        PhoneNumber(label="MobilePhone", phone_number="123456"),
        PhoneNumber(label="BusinessPhone", phone_number="123456"),
        PhoneNumber(label="OtherTelephone", phone_number="123456"),
    ],
    email_addresses=[
        EmailAddress(label="EmailAddress1", email="test@test.si"),
        EmailAddress(label="EmailAddress2", email="test2@test.si"),
    ],
    physical_addresses=[
        PhysicalAddress(
            label="Home",
            street="Test 30",
            city="TestCity",
            country="TestCountry",
            zipcode="8237",
        )
    ],
    company_name="Blue Anon Airlines",
)
contact.save()
Contact items have photo and notes fields, but they are apparently unused. Instead, you can
add a contact photo and notes like this:
from exchangelib import Account, FileAttachment

a = Account(...)
contact = a.contacts.get(given_name="John")
contact.body = "This is a note"
contact.save(update_fields=["body"])
att = FileAttachment(
    name="ContactPicture.jpg",
    content_type="image/png",
    is_inline=False,
    is_contact_photo=True,
    content=open("john_profile_picture.png", "rb").read(),
)
contact.attach(att)
Extended properties
Extended properties makes it possible to attach custom key-value pairs to items and folders on the Exchange server. There are multiple online resources that describe working with extended properties, and list many of the magic values that are used by existing Exchange clients to store common and custom properties. The following is not a comprehensive description of the possibilities, but we do intend to support all the possibilities provided by EWS.
If folder items have extended properties, you need to register them before you
can access them. Create a subclass of ExtendedProperty and define a set of
matching setup values:
from exchangelib import Account, ExtendedProperty, CalendarItem

a = Account(...)


class LunchMenu(ExtendedProperty):
    property_set_id = "12345678-1234-1234-1234-123456781234"
    property_name = "Catering from the cafeteria"
    property_type = "String"


# Register the property on the item type of your choice
CalendarItem.register("lunch_menu", LunchMenu)
# Now your property is available as the attribute 'lunch_menu', just like any
# other attribute.
item = CalendarItem(..., lunch_menu="Foie gras et consommé de légumes")
item.save()
for i in a.calendar.all():
    print(i.lunch_menu)
# If you change your mind, jsut remove the property again
CalendarItem.deregister("lunch_menu")


# You can also create named properties (e.g. created from User Defined Fields in
# Outlook, see issue #137):
class LunchMenu(ExtendedProperty):
    distinguished_property_set_id = "PublicStrings"
    property_name = "Catering from the cafeteria"
    property_type = "String"


# We support extended properties with tags. This is the definition for the
# 'completed' and 'followup' flag you can add to items in Outlook (see also
# issue #85):
class Flag(ExtendedProperty):
    property_tag = 0x1090
    property_type = "Integer"


# Or with property ID:
class MyMeetingArray(ExtendedProperty):
    property_set_id = "00062004-0000-0000-C000-000000000046"
    property_type = "BinaryArray"
    property_id = 32852


# Or using distinguished property sets combined with property ID (here as a hex
# value to align with the format usually mentioned in Microsoft docs). This is
# the definition for a response to an Outlook Vote request (see issue #198):
class VoteResponse(ExtendedProperty):
    distinguished_property_set_id = "Common"
    property_id = 0x00008524
    property_type = "String"
Extended properties also work with folders. For folders, it’s only possible to register custom fields on all folder types at once. This is because it’s difficult to provide a consistent API when some folders have custom fields and others don’t. Custom fields must be registered on the generic Folder or RootOfHierarchy folder classes.
Here’s an example of getting the size (in bytes) of a folder:
from exchangelib import ExtendedProperty, Folder


class FolderSize(ExtendedProperty):
    property_tag = 0x0E08
    property_type = "Integer"


Folder.register("size", FolderSize)
print(a.inbox.size)
In general, here’s how to work with any MAPI property as listed in e.g.
https://docs.microsoft.com/en-us/office/client-developer/outlook/mapi/mapi-properties.
Let’s take PidLidTaskDueDate as an example. This is the due date for a
message maked with the follow-up flag in Microsoft Outlook.
PidLidTaskDueDate is documented at
https://docs.microsoft.com/en-us/office/client-developer/outlook/mapi/pidlidtaskduedate-canonical-property.
The property ID is 0x00008105 and the property set is PSETID_Task. But EWS
wants the UUID for PSETID_Task, so we look that up in the MS-OXPROPS pdf:
https://docs.microsoft.com/en-us/openspecs/exchange_server_protocols/ms-oxprops/f6ab1613-aefe-447d-a49c-18217230b148
The UUID is 00062003-0000-0000-C000-000000000046. The property type is
PT_SYSTIME which is also called SystemTime (see
https://docs.microsoft.com/en-us/dotnet/api/microsoft.exchange.webservices.data.mapipropertytype )
In conclusion, the definition for the due date becomes:
from exchangelib import ExtendedProperty, Message


class FlagDue(ExtendedProperty):
    property_set_id = "00062003-0000-0000-C000-000000000046"
    property_id = 0x8105
    property_type = "SystemTime"


Message.register("flag_due", FlagDue)
Attachments
It’s possible to create, delete and get attachments connected to any item type. Here’s an example showing how to process attachments on existing items. FileAttachments have a ‘content’ attribute containing the binary content of the file, and ItemAttachments have an ‘item’ attribute containing the item. The item can be a Message, CalendarItem, Task etc.
import os.path
from exchangelib import Account, FileAttachment, ItemAttachment, Message

a = Account
for item in a.inbox.all():
    for attachment in item.attachments:
        if isinstance(attachment, FileAttachment):
            local_path = os.path.join("/tmp", attachment.name)
            with open(local_path, "wb") as f:
                f.write(attachment.content)
            print("Saved attachment to", local_path)
        elif isinstance(attachment, ItemAttachment):
            if isinstance(attachment.item, Message):
                print(attachment.item.subject, attachment.item.body)
Streaming downloads of file attachment is supported. This reduces memory consumption since we never store the full content of the file in-memory:
for item in a.inbox.all():
    for attachment in item.attachments:
        if isinstance(attachment, FileAttachment):
            local_path = os.path.join("/tmp", attachment.name)
            with open(local_path, "wb") as f, attachment.fp as fp:
                buffer = fp.read(1024)
                while buffer:
                    f.write(buffer)
                    buffer = fp.read(1024)
            print("Saved attachment to", local_path)
Some more examples of working with attachments:
# Create a new item with an attachment
item = Message(...)
# State the bytes directly, or read from file, BytesIO etc.
binary_file_content = "Hello from unicode æøå".encode("utf-8")
my_file = FileAttachment(name="my_file.txt", content=binary_file_content)
item.attach(my_file)
my_calendar_item = CalendarItem(...)
# If you got the item to attach from the server, you probably want to ignore the
# 'mime_content' field that contains copies of other field values on the item.
# This avoids duplicate attachments etc.
my_calendar_item.mime_content = None
my_appointment = ItemAttachment(name="my_appointment", item=my_calendar_item)
item.attach(my_appointment)
item.save()

# Add an attachment on an existing item
my_other_file = FileAttachment(name="my_other_file.txt", content=binary_file_content)
item.attach(my_other_file)

# Remove the attachment again
item.detach(my_file)
If you want to embed an image in the item body, you can link to the file in the HTML.
from exchangelib import HTMLBody

message = Message(...)
logo_filename = "logo.png"
with open(logo_filename, "rb") as f:
    my_logo = FileAttachment(
        name=logo_filename, content=f.read(), is_inline=True, content_id=logo_filename
    )
message.attach(my_logo)
# Most email systems
message.body = HTMLBody(
    '<html><body>Hello logo: <img src="cid:%s"></body></html>' % logo_filename
)
# Gmail needs this additional img attribute
message.body = HTMLBody("""\
<html>
  <body>Hello logo: <img data-imagetype="AttachmentByCid" src="cid:%s"></body>
</html>""" % logo_filename)
Attachments cannot be updated via EWS. If you want to change an attachment, you must detach the attachment, update the relevant fields, and attach as a new attachment.
Be aware that adding and deleting attachments from items that are already created in Exchange (items that have an item_id) will update the changekey of the item.
Recurring calendar items
There is full read-write support for creating recurring calendar items. You can create daily, weekly, monthly and yearly recurrences (the latter two in relative and absolute versions).
Here’s an example of creating 7 occurrences on Mondays and Wednesdays of every third week, starting September 1, 2017:
import datetime
from exchangelib import Account, CalendarItem
from exchangelib.fields import MONDAY, WEDNESDAY
from exchangelib.recurrence import Recurrence, WeeklyPattern

a = Account(...)
start = datetime.datetime(2017, 9, 1, 11, tzinfo=a.default_timezone)
end = start + datetime.timedelta(hours=2)
master_recurrence = CalendarItem(
    folder=a.calendar,
    start=start,
    end=end,
    subject="Hello Recurrence",
    recurrence=Recurrence(
        pattern=WeeklyPattern(interval=3, weekdays=[MONDAY, WEDNESDAY]),
        start=start.date(),
        number=7,
    ),
).save()

# Occurrence data for the master item
i = a.calendar.get(id=master_recurrence.id)
print(i.subject, i.start, i.end)
print(i.recurrence)
print(i.first_occurrence)
print(i.last_occurrence)
for o in i.modified_occurrences:
    print(o)
for o in i.deleted_occurrences:
    print(o)

# All occurrences expanded. The recurrence will span over 4 iterations of a
# 3-week period.
for i in a.calendar.view(start=start, end=start + datetime.timedelta(days=4 * 3 * 7)):
    print(i.subject, i.start, i.end)

# 'modified_occurrences' and 'deleted_occurrences' of master items are read-only
# fields. To delete or modify an occurrence, you must use 'view()' to fetch the
# occurrence and modify or delete it:
for occurrence in a.calendar.view(
    start=start, end=start + datetime.timedelta(days=4 * 3 * 7)
):
    # Delete or update random occurrences. This will affect
    # 'modified_occurrences' and  'deleted_occurrences' of the master item.
    if occurrence.start.microsecond % 2:
        # We receive timestamps as UTC but want to write back as local timezone
        occurrence.start = occurrence.start.astimezone(a.default_timezone)
        occurrence.start += datetime.timedelta(minutes=30)
        occurrence.end = occurrence.end.astimezone(a.default_timezone)
        occurrence.end += datetime.timedelta(minutes=30)
        occurrence.subject = "My new subject"
        occurrence.save()
    else:
        occurrence.delete()

# If you want to access a specific occurrence any you only have the master:
third_occurrence = master_recurrence.occurrence(index=3)
# Get all fields on this occurrence
third_occurrence.refresh()
# Change a field on the occurrence
third_occurrence.start += datetime.timedelta(hours=3)
# Delete occurrence
third_occurrence.save(update_fields=["start"])

# Similarly, you can reach the master recurrence from the occurrence
master = third_occurrence.recurring_master()
master.subject = "An update"
master.save(update_fields=["subject"])
Message timestamp fields
Each Message item has four timestamp fields:
datetime_createddatetime_sentdatetime_receivedlast_modified_time
The values for these fields are set by the Exchange server and are not
modifiable via EWS. All values are timezone-aware EWSDateTime
instances.
The datetime_sent value may be earlier than datetime_created.
Out of Facility (OOF)
You can get and set OOF messages using the Account.oof_settings
property:
import datetime
from exchangelib import Account, OofSettings

a = Account(...)

# Get the current OOF settings
a.oof_settings
# Change the OOF settings to something else
a.oof_settings = OofSettings(
    state=OofSettings.SCHEDULED,
    external_audience="Known",
    internal_reply="I'm in the pub. See ya guys!",
    external_reply="I'm having a business dinner in town",
    start=datetime.datetime(2017, 11, 1, 11, tzinfo=a.default_timezone),
    end=datetime.datetime(2017, 12, 1, 11, tzinfo=a.default_timezone),
)
# Disable OOF messages
a.oof_settings = OofSettings(
    state=OofSettings.DISABLED,
    internal_reply="",
    external_reply="",
)
Mail tips
Mail tips for an account contain some extra information about the account, e.g. OOF information, max message size, whether the mailbox is full, messages are moderated etc. Here’s how to get mail tips for a single account:
from exchangelib import Account

a = Account(...)
print(a.mail_tips)
Delegate information
An account can have delegates, which are other users that are allowed to access the account. Here’s how to fetch information about those delegates, including which level of access they have to the account.
from exchangelib import Account

a = Account(...)
print(a.delegates)
Inbox Rules
An account can have several inbox rules, which are used to trigger the rule actions for a rule based on the corresponding conditions in the mailbox. Here’s how to fetch information about those rules:
from exchangelib import Account

a = Account(...)
print(a.rules)
The InboxRules element represents an array of rules in the user’s mailbox. Each Rule is structured as follows:
id: Specifies the rule identifier.display_name: Contains the display name of a rule.priority: Indicates the order in which a rule is to be run.is_enabled: Indicates whether the rule is enabled.is_not_supported: Indicates whether the rule cannot be modified with the managed code APIs.is_in_error: Indicates whether the rule is in an error condition.conditions: Identifies the conditions that, when fulfilled, will trigger the rule actions for a rule.exceptions: Identifies the exceptions that represent all the available rule exception conditions for the inbox rule.actions: Represents the actions to be taken on a message when the conditions are fulfilled.
Here are examples of operations for adding, deleting, modifying, and querying InboxRules.
from exchangelib import Account
from exchangelib.properties import Actions, Conditions, Exceptions, Rule

a = Account(...)

print("Rules before creation:", a.rules, "\n")

# Create Rule instance
rule = Rule(
    account=a,
    display_name="test_exchangelib_rule",
    priority=1,
    is_enabled=True,
    conditions=Conditions(contains_sender_strings=["sender_example"]),
    exceptions=Exceptions(),
    actions=Actions(
        move_to_folder=a.trash,
        mark_as_read=True,
    ),
)

# Create rule
rule.save()
print("Rule:", rule)
print("Created rule with ID:", rule.id, "\n")

# Get rule list
print("Rules after creation:", a.rules, "\n")

# Modify rule
print("Modifying rule with ID:", rule.id)
rule.display_name = "test_exchangelib_rule(modified)"
rule.save()
print("Rules after modification:", a.rules, "\n")

# Delete rule
print("Deleting rule with ID:", rule.id)
rule.delete()
print("Rules after deletion:", a.rules)
Export and upload
Exchange supports backup and restore of folder contents using special
export and upload services. They are available on the Account model:
from exchangelib import Account

a = Account(...)
items = a.inbox.all().only("id", "changekey")
data = a.export(items)  # Pass a list of Items or (item_id, changekey) tuples
a.upload((a.inbox, d) for d in data)  # Expects a list of (folder, data) tuples
Synchronization, subscriptions and notifications
Methods for synchronization of folders and items, and for subscribing to, and
receiving notifications, are available on the Folder model. An in-depth
description of how to synchronize folders and items using EWS is available at
https://docs.microsoft.com/en-us/exchange/client-developer/exchange-web-services/mailbox-synchronization-and-ews-in-exchange.
A description of how to subscribe to notifications and receive notifications
using EWS is available at
https://docs.microsoft.com/en-us/exchange/client-developer/exchange-web-services/notification-subscriptions-mailbox-events-and-ews-in-exchange:
The following shows how to synchronize folders and items:
from exchangelib import Account

a = Account(...)

# Synchronize your local folder hierarchy underneath a.inbox
for change_type, item in a.inbox.sync_hierarchy():
    # Do something depending on the change types defined in
    # SyncFolderHierarchy.CHANGE_TYPES
    pass
# The next time you call a.inbox.sync_hierarchy(), you will only get folder
# changes since the last .sync_hierarchy() call. The sync status is stored in
# a.inbox.folder_sync_state.

# Synchronize your local items within a.inbox
for change_type, item in a.inbox.sync_items():
    # Do something depending on the change types defined in
    # SyncFolderItems.CHANGE_TYPES
    pass
# The next time you call a.inbox.sync_items(), you will only get item changes
# since the last .sync_items() call. The sync status is stored in
# a.inbox.item_sync_state.
EWS allows subscribing to changes in a mailbox. There are three types of subscriptions; pull,
push and streaming. For each type, you can subscribe to all folders at once, to a single
folder, or to a collection of folders (see description of FolderCollection above). In the
following, we show only examples for subscriptions on Account.inbox, but the others are
also possible.
Here’s how to create a pull subscription that can be used to pull events from the server:
# Subscribe to all folders
subscription_id, watermark = a.subscribe_to_pull()

# Subscribe to a collection of folders
subscription_id, watermark = a.inbox.glob("foo*").subscribe_to_pull()

# Subscribe to one folder
subscription_id, watermark = a.inbox.subscribe_to_pull()
Here’s how to create a push subscription. The server will regularly send an HTTP POST request to the callback URL to deliver changes or a status message. There is also support for parsing the POST data that the Exchange server sends to the callback URL, and for creating proper responses to these URLs.
subscription_id, watermark = a.inbox.subscribe_to_push(
    callback_url="https://my_app.example.com/callback_url"
)
When the server sends a push notification, the POST data contains a
SendNotification XML document. You can use this package in the callback URL
implementation to parse this data. Here’s a short example of a Flask app that
handles these documents:
from exchangelib.services import SendNotification
from flask import Flask, request

app = Flask(__name__)


@app.route("/callback_url", methods=["POST"])
def notify_me():
    ws = SendNotification(protocol=None)
    for notification in ws.parse(request.data):
        # ws.parse() returns Notification objects
        pass
    data = ws.ok_payload()
    # Or, if you want to end the subscription:
    data = ws.unsubscribe_payload()

    return data, 201, {"Content-Type": "text/xml; charset=utf-8"}
Here’s how to create a streaming subscription that can be used to stream events from the server.
subscription_id = a.inbox.subscribe_to_streaming()
Cancel the subscription when you’re done synchronizing. This is not supported for push subscriptions. They cancel automatically after a certain amount of failed attempts, or you can let your callback URL send an unsubscribe response as described above.
a.inbox.unsubscribe(subscription_id)
When creating subscriptions, you can also use one of the three context managers that handle unsubscription automatically:
with a.inbox.pull_subscription() as (subscription_id, watermark):
    pass

with a.inbox.push_subscription(
    callback_url="https://my_app.example.com/callback_url"
) as (subscription_id, watermark):
    pass

with a.inbox.streaming_subscription() as subscription_id:
    pass
Pull events from the server. This method returns Notification objects that
contain events in the events attribute and a new watermark in the
watermark attribute.
from exchangelib.properties import (
    CopiedEvent,
    CreatedEvent,
    DeletedEvent,
    ModifiedEvent,
)

for notification in a.inbox.get_events(subscription_id, watermark):
    for event in notification.events:
        if isinstance(event, (CreatedEvent, ModifiedEvent)):
            # Do something
            pass
        elif isinstance(event, (CopiedEvent, DeletedEvent)):
            # Do something else
            pass
Stream events from the server. This method returns Notification objects that
contain events in the events attribute. Takes an optional
connection_timeout argument that defines how long, in minutes, to keep the
connection open. .get_streaming_events() will block while the connection is
open, yielding notifications as they become available on the request stream.
.get_streaming_events() occupies a connection to the server while it’s
streaming events. If you need to do additional calls to the server while
streaming, e.g. fetching extra item fields, moving items to a folder, sending
emails etc, you need to make sure that you have enough connections to do so.
The default configuration is to only have 1 connection. See the documentation
on Configuration.max_connections on how to increase the connection count.
from exchangelib.properties import (
    MovedEvent,
    NewMailEvent,
    StatusEvent,
    FreeBusyChangedEvent,
)

for notification in a.inbox.get_streaming_events(subscription_id, connection_timeout=1):
    for event in notification.events:
        if isinstance(event, (MovedEvent, NewMailEvent)):
            # Do something
            pass
        elif isinstance(event, (StatusEvent, FreeBusyChangedEvent)):
            # Do something else
            pass
Non-account services
from exchangelib import Account, DLMailbox
from exchangelib.properties import AlternateId, EWS_ID, OWA_ID

a = Account(...)

# Get timezone information from the server
a.protocol.get_timezones()

# Get room lists defined on the server
a.protocol.get_roomlists()

# Get rooms belonging to a specific room list
for rl in a.protocol.get_roomlists():
    a.protocol.get_rooms(rl)

# Get account information for a list of names or email addresses
for mailbox in a.protocol.resolve_names(["ann@example.com", "ben@example.com"]):
    print(mailbox.email_address)
for mailbox, contact in a.protocol.resolve_names(
    ["anne", "bart"], return_full_contact_data=True
):
    print(mailbox.email_address, contact.display_name)

# Get all mailboxes on a distribution list
for mailbox in a.protocol.expand_dl(
    DLMailbox(email_address="distro@example.com", mailbox_type="PublicDL")
):
    print(mailbox.email_address)
# Or just pass a string containing the SMTP address
for mailbox in a.protocol.expand_dl("distro@example.com"):
    print(mailbox.email_address)

# Convert item IDs from one format to another
for converted_id in a.protocol.convert_ids(
    [
        AlternateId(id="AAA=", format=EWS_ID, mailbox=a.primary_smtp_address),
    ],
    destination_format=OWA_ID,
):
    print(converted_id)

# Get searchable mailboxes. This method is only available to users who have been
# assigned the Discovery Management RBAC role. (This feature works on Exchange
# 2013 onwards)
for mailbox in a.protocol.get_searchable_mailboxes():
    print(mailbox)
EWS supports getting availability information for a set of users in a certain timeframe. The server returns an object for each account containing free/busy information, including a list of calendar events in the user’s calendar, and the working hours and timezone of the user.
import datetime
from exchangelib import Account

a = Account(...)
start = datetime.datetime.now(a.default_timezone)
end = start + datetime.timedelta(hours=6)
accounts = [(a, "Organizer", False)]
for busy_info in a.protocol.get_free_busy_info(accounts=accounts, start=start, end=end):
    print(busy_info)
The calendar events and working hours are returned as naive datetimes. To convert to timezone-aware datetimes, a bit of extra work is needed if the users are not known to be in the same timezone.
# Get all server timezones. We need that to convert 'working_hours_timezone'
import datetime
from exchangelib import Account, EWSTimeZone

a = Account(...)
timezones = list(a.protocol.get_timezones(return_full_timezone_data=True))

# Get availability information for a list of accounts
start = datetime.datetime.now(a.default_timezone)
end = start + datetime.timedelta(hours=6)
# get_free_busy_info expects (account, attendee_type, exclude_conflicts) tuples
accounts = [(a, "Organizer", False)]
for busy_info in a.protocol.get_free_busy_info(accounts=accounts, start=start, end=end):
    # Convert the TimeZone object to a Microsoft timezone ID
    ms_id = busy_info.working_hours_timezone.to_server_timezone(timezones, start.year)
    account_tz = EWSTimeZone.from_ms_id(ms_id)
    print(account_tz, busy_info.working_hours)
    for event in busy_info.calendar_events:
        print(account_tz.localize(event.start), account_tz.localize(event.end))
Troubleshooting
If you are having trouble using this library, the first thing to try is to enable debug logging. This will output a huge amount of information about what is going on, most notable the actual XML documents that are going over the wire. This can be really handy to see which fields are being sent and received.
import logging

# This handler will pretty-print and syntax highlight the request and response
# XML documents
from exchangelib.util import PrettyXmlHandler

logging.basicConfig(level=logging.DEBUG, handlers=[PrettyXmlHandler()])
# Your code using exchangelib goes here
Most class definitions have a docstring containing at least a URL to the MSDN page for the corresponding XML element.
from exchangelib import CalendarItem

print(CalendarItem.__doc__)
Tests
The test suite is split into unit tests, and integration tests that require a real Exchange
server. If you want to run the full test suite, you must provide setup parameters for
a test account. Copy settings.yml.sample to settings.yml and change the default
parameters. If a settings.yml is available, we will run the entire test suite. Otherwise,
just the unit tests are run.
WARNING: The test account should not contain valuable data. The tests try hard to no touch existing data in the account, but accidents happen.
You can run either the entire test suite or individual tests.
# Install dependencies
python -m pip install -r test-requirements.txt

# Full test suite
python -m unittest

# Single test class or test case
python -m unittest -k test_folder.FolderTest.test_refresh

# If you want extreme levels of debug output:
DEBUG=1 python -m unittest -k test_folder.FolderTest.test_refresh

# Running tests in parallel using the 'unittest-parallel' dependency
unittest-parallel -j 4 --level=class
Contributing
This repo uses pre-commit hooks. Before committing changes, install the hooks:
pip install pre-commit
pre-commit install
pre-commit run